I’m currently on holiday for a week, touring the UK, in car with a baby and a five year old. For reference, no we not ‘nearly there yet’. This blog post was written before we left and then scheduled to go live on Monday morning as usual. Hopefully it worked.
I thought people might be interested in a day in the life of a games designer, self publisher and parent in full time employment, so that the subject of this week’s blog.
My days usually start between 5 and 5:30 when The Baby finally ‘wakes up’. I say this in quotes because, like her sister before her, she’s a terrible sleeper and wakes hourly from about 11pm. I help out with a few of those, but The Wife bears the brunt of it, so come 5am it is definitely my turn. My day doesn’t start with meditation, a quick workout and then blitzing emails and a brainstorming session like most internet business gurus, instead it starts with 30-60 minutes of passing a series of soft toys to a baby who is far more conscious than I am while I stagger blearily into wakefulness.
At 6 the day begins as we shower, have a family breakfast and get the girls ready before I head off to work around 8. I walk to work (it’s just over 2.5 miles each way which I do at a breakneck pace as it’s my only exercise). The walks in and home are a great opportunity to think about the games I’m designing, graphic design and art ideas and company stuff in general.
Most days I spend my 30 minute lunch break on something games related: updating the website, graphic design, art or playtesting, or something similar.
I leave work between 5 and 5:30 most days and usually get home from work around six and get to spend 30-60 minutes with the girls before bedtimes begin. This sometimes includes a family dinner, but often The Wife and I will eat once they are down as the girls will have eaten earlier.
At seven, while The Wife gets The Baby to sleep, I get Daughter the First ready for bed and read her stories. Once The Baby is asleep she takes over and I head downstairs to clean up. The cleaning and dinner take until 8:30-9 most nights, then we have some free time!
Now as I’ve mentioned already, The Baby sleeps really badly, and The Wife takes the brunt of it, so I help out where I can in the night. If I go to bed at 10 I’ll get 7-7.5 hours of broken sleep. I’m one of those guys who needs eight hours, so I’m never really functioning on all cylinders. But ten pm is doable as long as I get one or two earlier nights a week (Games Night on Thursday usually means getting to bed after 11, which hurts).
So I get 1-1.5 hours a night for fun. I want to spend several of these with The Wife, Games Night takes up one most weeks, so I get 2-4.5 hours a week for Eurydice Games! A batch of six copies of Zombology takes 4.5 hours to make, so with a following wind I can make one batch a week (it’s been one a month for the last few months as I’ve been focussing on FlickFleet instead).
I’m looking forward to The Baby sleeping better, so I can extend my evenings later and get more done in fewer evenings so I can spend more time with The Wife too.
Hopefully we’ve less than a year to wait!
Monday, May 28
Monday, May 21
Hectic Couple of Weeks
It was Beer and Pretzels this weekend, a convention I’ve attended a lot over the last ten years, usually with my mate Terry, whose games group I was a member of when we lived down south (‘09-‘11). I missed it last year as The Baby was due within a week of it, and this year I’ve had to skip it again as it’s just before a crazy week.
Next weekend we drive to Oxford for a wedding, then Salisbury for a holiday with my whole family (16 of us!) then drive home just in time for me to drive to Birmingham for The UK Games Expo. I’ll only be at the Expo on Sunday for the day (where, shameless plug, I’ll be giving a seminar on hand-crafting games during which I’ll craft a copy of Zombology from scratch - Sunday, 1-2pm in the Piazza Small).
Last week and this week have been very busy as a result, but it’s been great to make some decent progress after months of sleep-deprived survival.
I’ve been trying to get 13 more copies of Zombology finished so I’ve got some stock for the Expo, so I’ve spent my evenings on that after the girls are asleep and I’ve cleaned up and eaten. At the same time I’ve spent my lunchbreaks at work on FlickFleet art. Last week it was the ship dashboards, which are nearly finished now, next up is making the rule book prettier and finishing a first rough cut of the box art.
Here’s a look at the latest dashboard style - any feedback? I’d love to know what you like and what you don’t!

Monday, May 14
How To: Craft a Tray and Lid Box
Last week on Google+ long time reader Derek asked for more details on how to make game boxes. So here's a detailed tutorial on how I made the boxes for Border Reivers, It's Alive 1st Edition and the two hand-crafted versions of Zombology I've done. It's quite long, but there's lots of pictures to break it up!
If you found this interesting and are planning on attending the UK Games Expo at the beginnging of June in Birmingham you can see me hand-craft a copy of Zombology from scratch in front of a live audience! My Made by Hand seminar is 1-2pm on Sunday 3rd June in the Piazza Small.
For this tutorial you'll need a good ruler with a steel cutting edge (ideally that lies flat with the cutting surface) and a clear scale for measuring, a self-healing cutting mat and a sharp knife (I use an Xacto-style knife with snap off blades).
So, let's get started. The first thing you'll need to do is choose a box size. For this I strongly recommend choosing a game you own and making your box that size. There's three good reasons for this:
You can empty that game's box and check the bits fit in ok
Games look cool on the shelf if they are all the same size - it's easier to store them and stores to stock them
If you want your game to go into manufacturing, using a standard box size saves you the cost of tooling new dies for the box blanks and labels, shipping crates, etc.
My personal philosophy is that the game box should be the smallest one that the components can comfortably fit in, but if you're hoping to go into retail your box needs to reflect your MSRP. Being the only £25 game on the small games shelf really hurt sales of Sumeria. Once you know your manufacturing cost, times that by five and go into a game store - how big are the boxes for games that cost that much?
Once you've picked a box size, measure the width (W), height (H) and depth (D - the distance between the lid opening and the top of the lid) of the box lid. The dimensions of your box blank (BW and BH) are W+2*D by H+2*D. You need two rectangles of greyboard (chipboard I think in the US and Canada) that size. I usually use 750micron (0.75 millimetres thick) greyboard for a small box or light game and 1250micron (1.25 millimetres thick) for heavy or larger games.

On that greyboard measure out two rectangles that are BW by BH. Then draw lines that are D in from every edge on one of them (this is your box lid). For the tray the lines need to be further in, for a 750micron thick box you can draw them D + 1mm in, for 1.25micron greyboard you'll need D + 2mm. Making the box blanks the same total size means that the tray is smaller, but taller than the lid - this means you have a small amount of tray showing when the lid is on, so it's easier to open the box.

The next step is to cut the small squares out from each corner of the tray and lid blanks, and to score (gently scratch with a knife - not all the way through) the remaining bits of the lines you drew.

Now turn the blanks over so the drawn and scored lines are underneath and fold the sides of the tray and lid up along the scored lines.

The final step of making the blanks is to tape the box corners. I use Scotch Magic Tape for this as it has a nice matt surface that the label sticks to nicely.

For a prototype I'll often stop there:

But for a hand-crafted game you want this to look like a real game that's been professionally manufactured. So you need labels. In the old days I used to get these printed onto paper (and then professionally laminated for durability) and then glue them on by coating them in watered down PVA glue. This is an awful idea - don't do that! For a smaller game where high fidelity isn't critical you can print onto label paper (I think you can get it in up to A4/Letter size), but I've started using Vinyl labels (also professionally laminated) for Zombology which are awesome (if expensive). Your box art will need to be W+2*D+30mm by H+2*H+30mm so that there's 15mm of label on each side to wrap over the box into the inside. Do the box label art (and getting it all the right way up!) is enough content for another post, needless to say you'll have to get this right!

My next step is to cut out the labels. You want the long edges to go from the corners of the box top/bottom straight out to the edge of the label (you can make them 2 or 3mm narrower at the label edge if you want - this makes the wrap slightly smoother on the inside, but it slows down cutting a bit as you can't do both cuts at the same time without moving the ruler). The shorter edges need to go from the corners of the box tray/lid 45° to the depth of the box, before going straight out to the label edge - see below:

Once you've cut out the labels, take the box lid label and the box lid blank (be careful at this point - the box blank lid and tray look almost identical!). Remove the label backing and place it face down. Place the box blank on top, being very careful to line up all four corners of the box blank with the corners cut into the label. Press down firmly across the whole blank surface to get a good adhesion to the label.

The next step is to do the shorter sides. Roll the blank onto one short side, pressing firmly along the blank to make sure it adheres well to the label. Now cut from just inside the corner of the box to the label edge (so the cut goes slightly towards the middle of label edge), and then again towards the corner of the label where the 45° cut turns towards the label edge. You want to err towards the 45° cut at this point, you don't want any label ending above the blank edge when you wrap the label over the corners.

Now starting in the middle and working out towards the corners, pinch the label over the edge of the blank. Make sure the label sticks really well both on the inside and the outside of the box edge.

You can now wrap the two diagonally cut pieces round the corners of the box - this strengthens the box corners and also ensures that none of the greyboard will be visible on the corners. Repeat the last four steps on the other short side.

Next up are the long edges. Roll the box blank onto one of the long edges and press down firmly along the edge to ensure the label sticks well across the whole edge.
Starting in the middle again and working out towards the corners, pinch the label over the edge of the blank. Make sure the label sticks really well both on the inside and the outside of the box edge. If you cut the long edge straight out to the label edge you might need to pay attention to pressing the label into the corners on the inside, which is less of a problem if you cut the label slightly in towards the middle. Repeat this process on the other long edge.

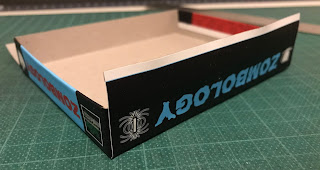
Repeat this process on the box tray and Hey Presto! you have a professional looking tray and lid box!

I hope this was helpful - let me know in the comments if you'd like any more details or another How To post on something else (e.g. box art layout).
If you found this interesting and are planning on attending the UK Games Expo at the beginnging of June in Birmingham you can see me hand-craft a copy of Zombology from scratch in front of a live audience! My Made by Hand seminar is 1-2pm on Sunday 3rd June in the Piazza Small.
For this tutorial you'll need a good ruler with a steel cutting edge (ideally that lies flat with the cutting surface) and a clear scale for measuring, a self-healing cutting mat and a sharp knife (I use an Xacto-style knife with snap off blades).
So, let's get started. The first thing you'll need to do is choose a box size. For this I strongly recommend choosing a game you own and making your box that size. There's three good reasons for this:
My personal philosophy is that the game box should be the smallest one that the components can comfortably fit in, but if you're hoping to go into retail your box needs to reflect your MSRP. Being the only £25 game on the small games shelf really hurt sales of Sumeria. Once you know your manufacturing cost, times that by five and go into a game store - how big are the boxes for games that cost that much?
Once you've picked a box size, measure the width (W), height (H) and depth (D - the distance between the lid opening and the top of the lid) of the box lid. The dimensions of your box blank (BW and BH) are W+2*D by H+2*D. You need two rectangles of greyboard (chipboard I think in the US and Canada) that size. I usually use 750micron (0.75 millimetres thick) greyboard for a small box or light game and 1250micron (1.25 millimetres thick) for heavy or larger games.

On that greyboard measure out two rectangles that are BW by BH. Then draw lines that are D in from every edge on one of them (this is your box lid). For the tray the lines need to be further in, for a 750micron thick box you can draw them D + 1mm in, for 1.25micron greyboard you'll need D + 2mm. Making the box blanks the same total size means that the tray is smaller, but taller than the lid - this means you have a small amount of tray showing when the lid is on, so it's easier to open the box.

The next step is to cut the small squares out from each corner of the tray and lid blanks, and to score (gently scratch with a knife - not all the way through) the remaining bits of the lines you drew.

Now turn the blanks over so the drawn and scored lines are underneath and fold the sides of the tray and lid up along the scored lines.

The final step of making the blanks is to tape the box corners. I use Scotch Magic Tape for this as it has a nice matt surface that the label sticks to nicely.

For a prototype I'll often stop there:

But for a hand-crafted game you want this to look like a real game that's been professionally manufactured. So you need labels. In the old days I used to get these printed onto paper (and then professionally laminated for durability) and then glue them on by coating them in watered down PVA glue. This is an awful idea - don't do that! For a smaller game where high fidelity isn't critical you can print onto label paper (I think you can get it in up to A4/Letter size), but I've started using Vinyl labels (also professionally laminated) for Zombology which are awesome (if expensive). Your box art will need to be W+2*D+30mm by H+2*H+30mm so that there's 15mm of label on each side to wrap over the box into the inside. Do the box label art (and getting it all the right way up!) is enough content for another post, needless to say you'll have to get this right!

My next step is to cut out the labels. You want the long edges to go from the corners of the box top/bottom straight out to the edge of the label (you can make them 2 or 3mm narrower at the label edge if you want - this makes the wrap slightly smoother on the inside, but it slows down cutting a bit as you can't do both cuts at the same time without moving the ruler). The shorter edges need to go from the corners of the box tray/lid 45° to the depth of the box, before going straight out to the label edge - see below:

Once you've cut out the labels, take the box lid label and the box lid blank (be careful at this point - the box blank lid and tray look almost identical!). Remove the label backing and place it face down. Place the box blank on top, being very careful to line up all four corners of the box blank with the corners cut into the label. Press down firmly across the whole blank surface to get a good adhesion to the label.

The next step is to do the shorter sides. Roll the blank onto one short side, pressing firmly along the blank to make sure it adheres well to the label. Now cut from just inside the corner of the box to the label edge (so the cut goes slightly towards the middle of label edge), and then again towards the corner of the label where the 45° cut turns towards the label edge. You want to err towards the 45° cut at this point, you don't want any label ending above the blank edge when you wrap the label over the corners.

Now starting in the middle and working out towards the corners, pinch the label over the edge of the blank. Make sure the label sticks really well both on the inside and the outside of the box edge.

You can now wrap the two diagonally cut pieces round the corners of the box - this strengthens the box corners and also ensures that none of the greyboard will be visible on the corners. Repeat the last four steps on the other short side.

Next up are the long edges. Roll the box blank onto one of the long edges and press down firmly along the edge to ensure the label sticks well across the whole edge.

Starting in the middle again and working out towards the corners, pinch the label over the edge of the blank. Make sure the label sticks really well both on the inside and the outside of the box edge. If you cut the long edge straight out to the label edge you might need to pay attention to pressing the label into the corners on the inside, which is less of a problem if you cut the label slightly in towards the middle. Repeat this process on the other long edge.

Repeat this process on the box tray and Hey Presto! you have a professional looking tray and lid box!

I hope this was helpful - let me know in the comments if you'd like any more details or another How To post on something else (e.g. box art layout).
Monday, May 7
Brief but Thankful
I usually write my blog posts in my lunch break at work or, failing that, at the weekend. This week I’ve spent my lunch breaks finishing off my new website (any feedback appreciated!) and this weekend we’re going away to celebrate our 15th wedding anniversary! So needless to say I’ll not be spending a decent chunk of our holiday writing a long blog post!
So this is a short one to say: in your quest to be successful at designing games (or whatever else it is that you want to achieve) make sure you have a support network. One or more people who love you and want you to be happy and succeed. They could be a partner, spouse, parent, child, sibling or best mate. Find them and treasure them - their support is priceless.
And thank you to The Wife for being mine for the last 21 years!
Subscribe to:
Posts (Atom)

